Build a Farcaster Bot for human-readable alerts
In this guide, you will learn how to create a Farcaster bot that sends human-readable alerts about transactions happening on-chain. You can customize this bot for any EVM-compatible blockchain, and you don’t need any specific knowledge about EVM transaction decoding and interpretation.
Guide
Step 0: Prerequisites
- An installed Bun (see installation guide here)
- An Alchemy account (sign up here)
- An Etherscan(Basescan) account (sign up here)
- A Farcaster account (can be yours or a separate one for your bot)
Step 1: Clone the Repository
Clone the Bot repository and install project dependencies:
git clone https://github.com/3loop/farcaster-onchain-alerts-botcd farcaster-onchain-alerts-botbun iStep 2: Add Etherescan and Alchemy API Keys
Copy and rename the .env.example file to .env, then paste the Alchemy and Etherescan API keys into the ALCHEMY_API_KEY and ETHERSCAN_API_KEY variables.
cp .env.example .envvim .envTo reproduce the Friend.tech alerts bot, you need to create an Alchemy App for the Base Mainnet and get an API key from the Basescan. We use the Alchemy API key to monitor new transactions, and the Etherscan API key (from the free plan) to fetch contract ABIs and avoid hitting rate limits. The Etherscan API could be optional if the transactions you are interested in do not interact with many contracts.
Step 3: Create a Farcaster Account Key (Signer)
A Farcaster signer is a separate Ed25519 public and private key pair connected to your Farcaster account that you need for posting messages on your behalf. To connect the key pair, you have to send a transaction from your Farcaster wallet to the Key Registry Farcaster smart contract. At the moment of writing this guide, there was no simple way to create and connect the signer without using 3rd party APIs. So we made a script to generate the required transaction, and to run it you need to do the following:
- Fund your Farcaster custody wallet on Optimism:: You need some ETH on the Optimism chain to pay for the gas. A few dollars would be enough. Click on the 3 dots near your profile, press “About,” and there you will find your custody address.
- Get your Farcaster recovery phrase: On your phone, go to settings -> advanced -> recovery phrase, and write this recovery phrase into the
MNEMONICvariable in thescripts/create-signer.tsfile. - Run the script: Run the following command
bun run scripts/create-signer.ts. The result of this script will be an Optimism transaction like this, and a public and private key printed in the console. Do not share the private key. - Add env variables: Add the private key generated from the script and the bot’s account FID into the
SIGNER_PRIVATE_KEYandACCOUNT_FIDvariables.
Step 4: Setup the Decoder
Now, let’s go through the code. To begin using the Loop Decoder, we need to set up the following components:
RPC Provider
We’ll create a function that returns an object with aPublicClient based on the chain ID. In this example, we are going to support the Base Mainnet.
The constants.ts file contains the RPC URL and configuration. The Base RPCs do not support a trace API, so we need to specify it in the configuration:
export const RPC = {  8453: {    // Transaciton decoder by default needs archive node for transaction tracing    // becasue Alchemy free plan does not provide archive nodes, we use a different RPC here    archiveUrl: process.env.ARCHIVE_RPC_URL,
    // Provide "none" when transaciton tracing is not needed    traceAPI: 'geth',  },}
The getPublicClient returns an RPC client based on the chaind ID and the config from constants.ts:
import { createPublicClient } from 'viem'
const getPublicClient = (chainId: number) => {  const rpc = RPC[chainId as keyof typeof RPC]  if (!rpc) throw new Error(`Missing RPC provider for chain ID ${chainId}`)
  return {    client: createPublicClient({ transport: http(rpc.archiveUrl) }),    config: { traceAPI: rpc.traceAPI },  }}
ABI Loader
To avoid making unecessary calls to third-party APIs, Loop Decoder uses an API that allows cache. For this example, we will keep it simple and use an in-memory cache. We will also use some strategies to download contract ABIs from Etherscan and 4byte.directory. You can find more information about the strategies in the Strategies reference.
Create a cache for contract ABI:
import {  EtherscanStrategyResolver,  FourByteStrategyResolver,  VanillaAbiStore,  ContractABI,} from '@3loop/transaction-decoder'
// Create an in-memory cache for the ABIsconst abiCache = new Map<string, ContractABI>()
// ABI store implementation with caching and multiple resolution strategiesconst abiStore: VanillaAbiStore = {  strategies: [    // List of stratagies to resolve new ABIs    EtherscanV2StrategyResolver({      apikey: process.env.ETHERSCAN_API_KEY || '',    }),    FourByteStrategyResolver(),  ],
  // Get ABI from memory by address, event or signature  // Can be returned the list of all possible ABIs  get: async ({ address, event, signature }) => {    const key = address?.toLowerCase() || event || signature    if (!key) return []
    const cached = abiCache.get(key)    return cached      ? [          {            ...cached,            id: key,            source: 'etherscan',            status: 'success',          },        ]      : []  },
  set: async (_key, abi) => {    const key =      abi.type === 'address'        ? abi.address.toLowerCase()        : abi.type === 'event'        ? abi.event        : abi.type === 'func'        ? abi.signature        : null
    if (key) abiCache.set(key, abi)  },}
Contract Metadata Loader
Create an in-memory cache for contract meta-information. Using ERC20RPCStrategyResolver we will automatically retrieve token meta information from the contract such as token name, decimals, symbol, etc.
import type { ContractData, VanillaContractMetaStore } from '@3loop/transaction-decoder'import { ERC20RPCStrategyResolver } from '@3loop/transaction-decoder'
// Create an in-memory cache for the contract meta-informationconst contractMetaCache = new Map<string, ContractData>()
// Contract metadata store implementation with in-memory cachingconst contractMetaStore: VanillaContractMetaStore = {  strategies: [ERC20RPCStrategyResolver],
  get: async ({ address, chainID }) => {    const key = `${address}-${chainID}`.toLowerCase()    const cached = contractMetaCache.get(key)    return cached ? { status: 'success', result: cached } : { status: 'empty', result: null }  },
  set: async ({ address, chainID }, result) => {    if (result.status === 'success') {      contractMetaCache.set(`${address}-${chainID}`.toLowerCase(), result.result)    }  },}
Loop Decoder instance
Finally, we’ll create a new instance of the LoopDecoder class.
import { TransactionDecoder } from '@3loop/transaction-decoder'
const decoder = new TransactionDecoder({  getPublicClient: getPublicClient,  abiStore: abiStore,  contractMetaStore: contractMetaStore,})
Step 5: Decode and Interpret a Transaction
After creating the decoder object in the decoder.ts file, we can use its decodeTransaction method to decode transactions by hash:
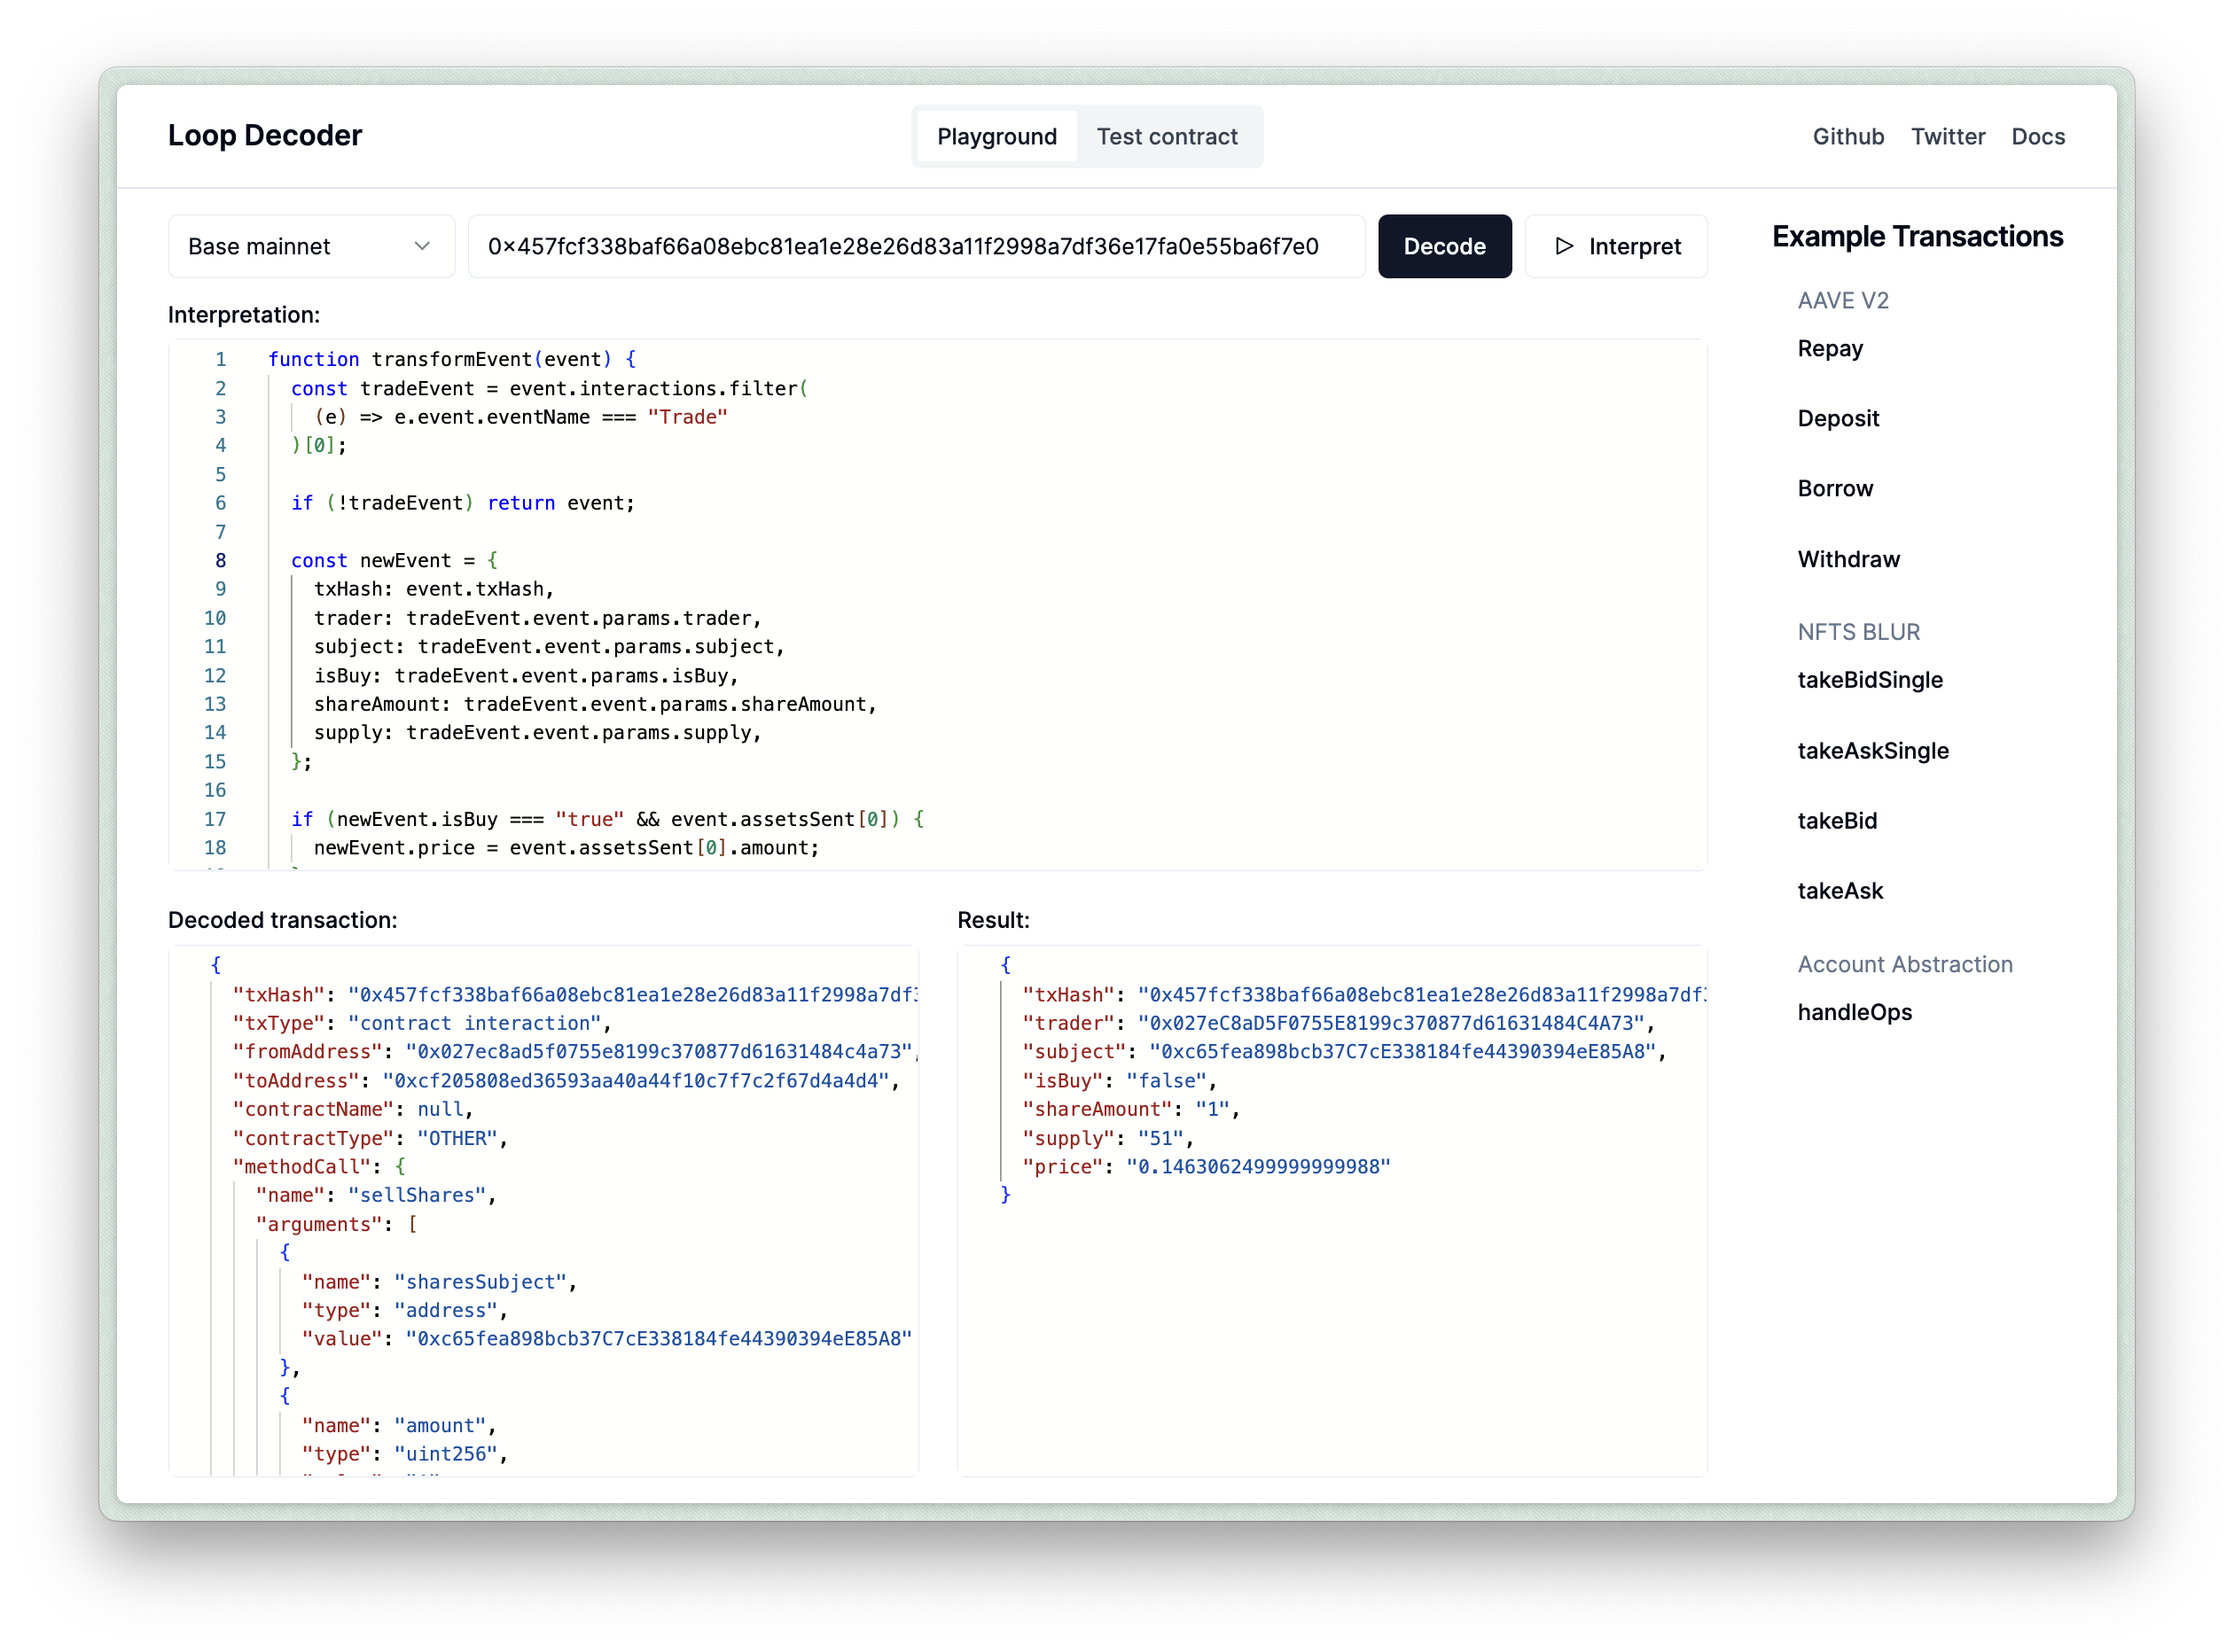
const decoded = await decoder.decodeTransaction({ chainID: CHAIN_ID, hash: txHash,})The decodeTransaction method returns a DecodedTransaction object, which you can inspect using our playground. Here is an example of the Friend.tech transaction.
To interpret a decoded transaction, the interpreter.ts file contains a transformEvent function that transforms the DecodedTransaction and adds an action description. You can test the transformEvent function by putting it into the Interpretation field on the playground with the Friend.tech example, and pressing “Interpret”.
Step 6: Create a Contract Subscription
The bot is set to monitor Friend.tech transactions on the Base Mainnet. The configuration variables are located in the constants.ts file:
export const CONTRACT_ADDRESS = '0xcf205808ed36593aa40a44f10c7f7c2f67d4a4d4'export const CHAIN_ID = 8453In the program’s entry point, we start a WebSocket subscription for new transactions using Alchemy’s WebSocket RPC.
const wsClient = createPublicClient({  transport: webSocket(ALCHEMY_WS_RPC_URL),})
async function createSubscription(address: string) {  await wsClient.transport.subscribe({    method: 'eth_subscribe',    params: [      //@ts-ignore      'alchemy_minedTransactions',      {        addresses: [{ to: address }],        includeRemoved: false,        hashesOnly: true,      },    ],    onData: (data: any) => {      const hash = data?.result?.transaction?.hash      if (hash) handleTransaction(hash)    },    //...  })}
createSubscription(CONTRACT_ADDRESS)
Step 7: Handle a new Transaction
The handleTransaction function is responsible for decoding incoming alerts and publishing them as Farcaster casts.
async function handleTransaction(txHash?: string) { try { //... const decoded = await decoder.decodeTransaction({ chainID: CHAIN_ID, hash: txHash, })
if (!decoded) return const interpreted = interpretTx(decoded)
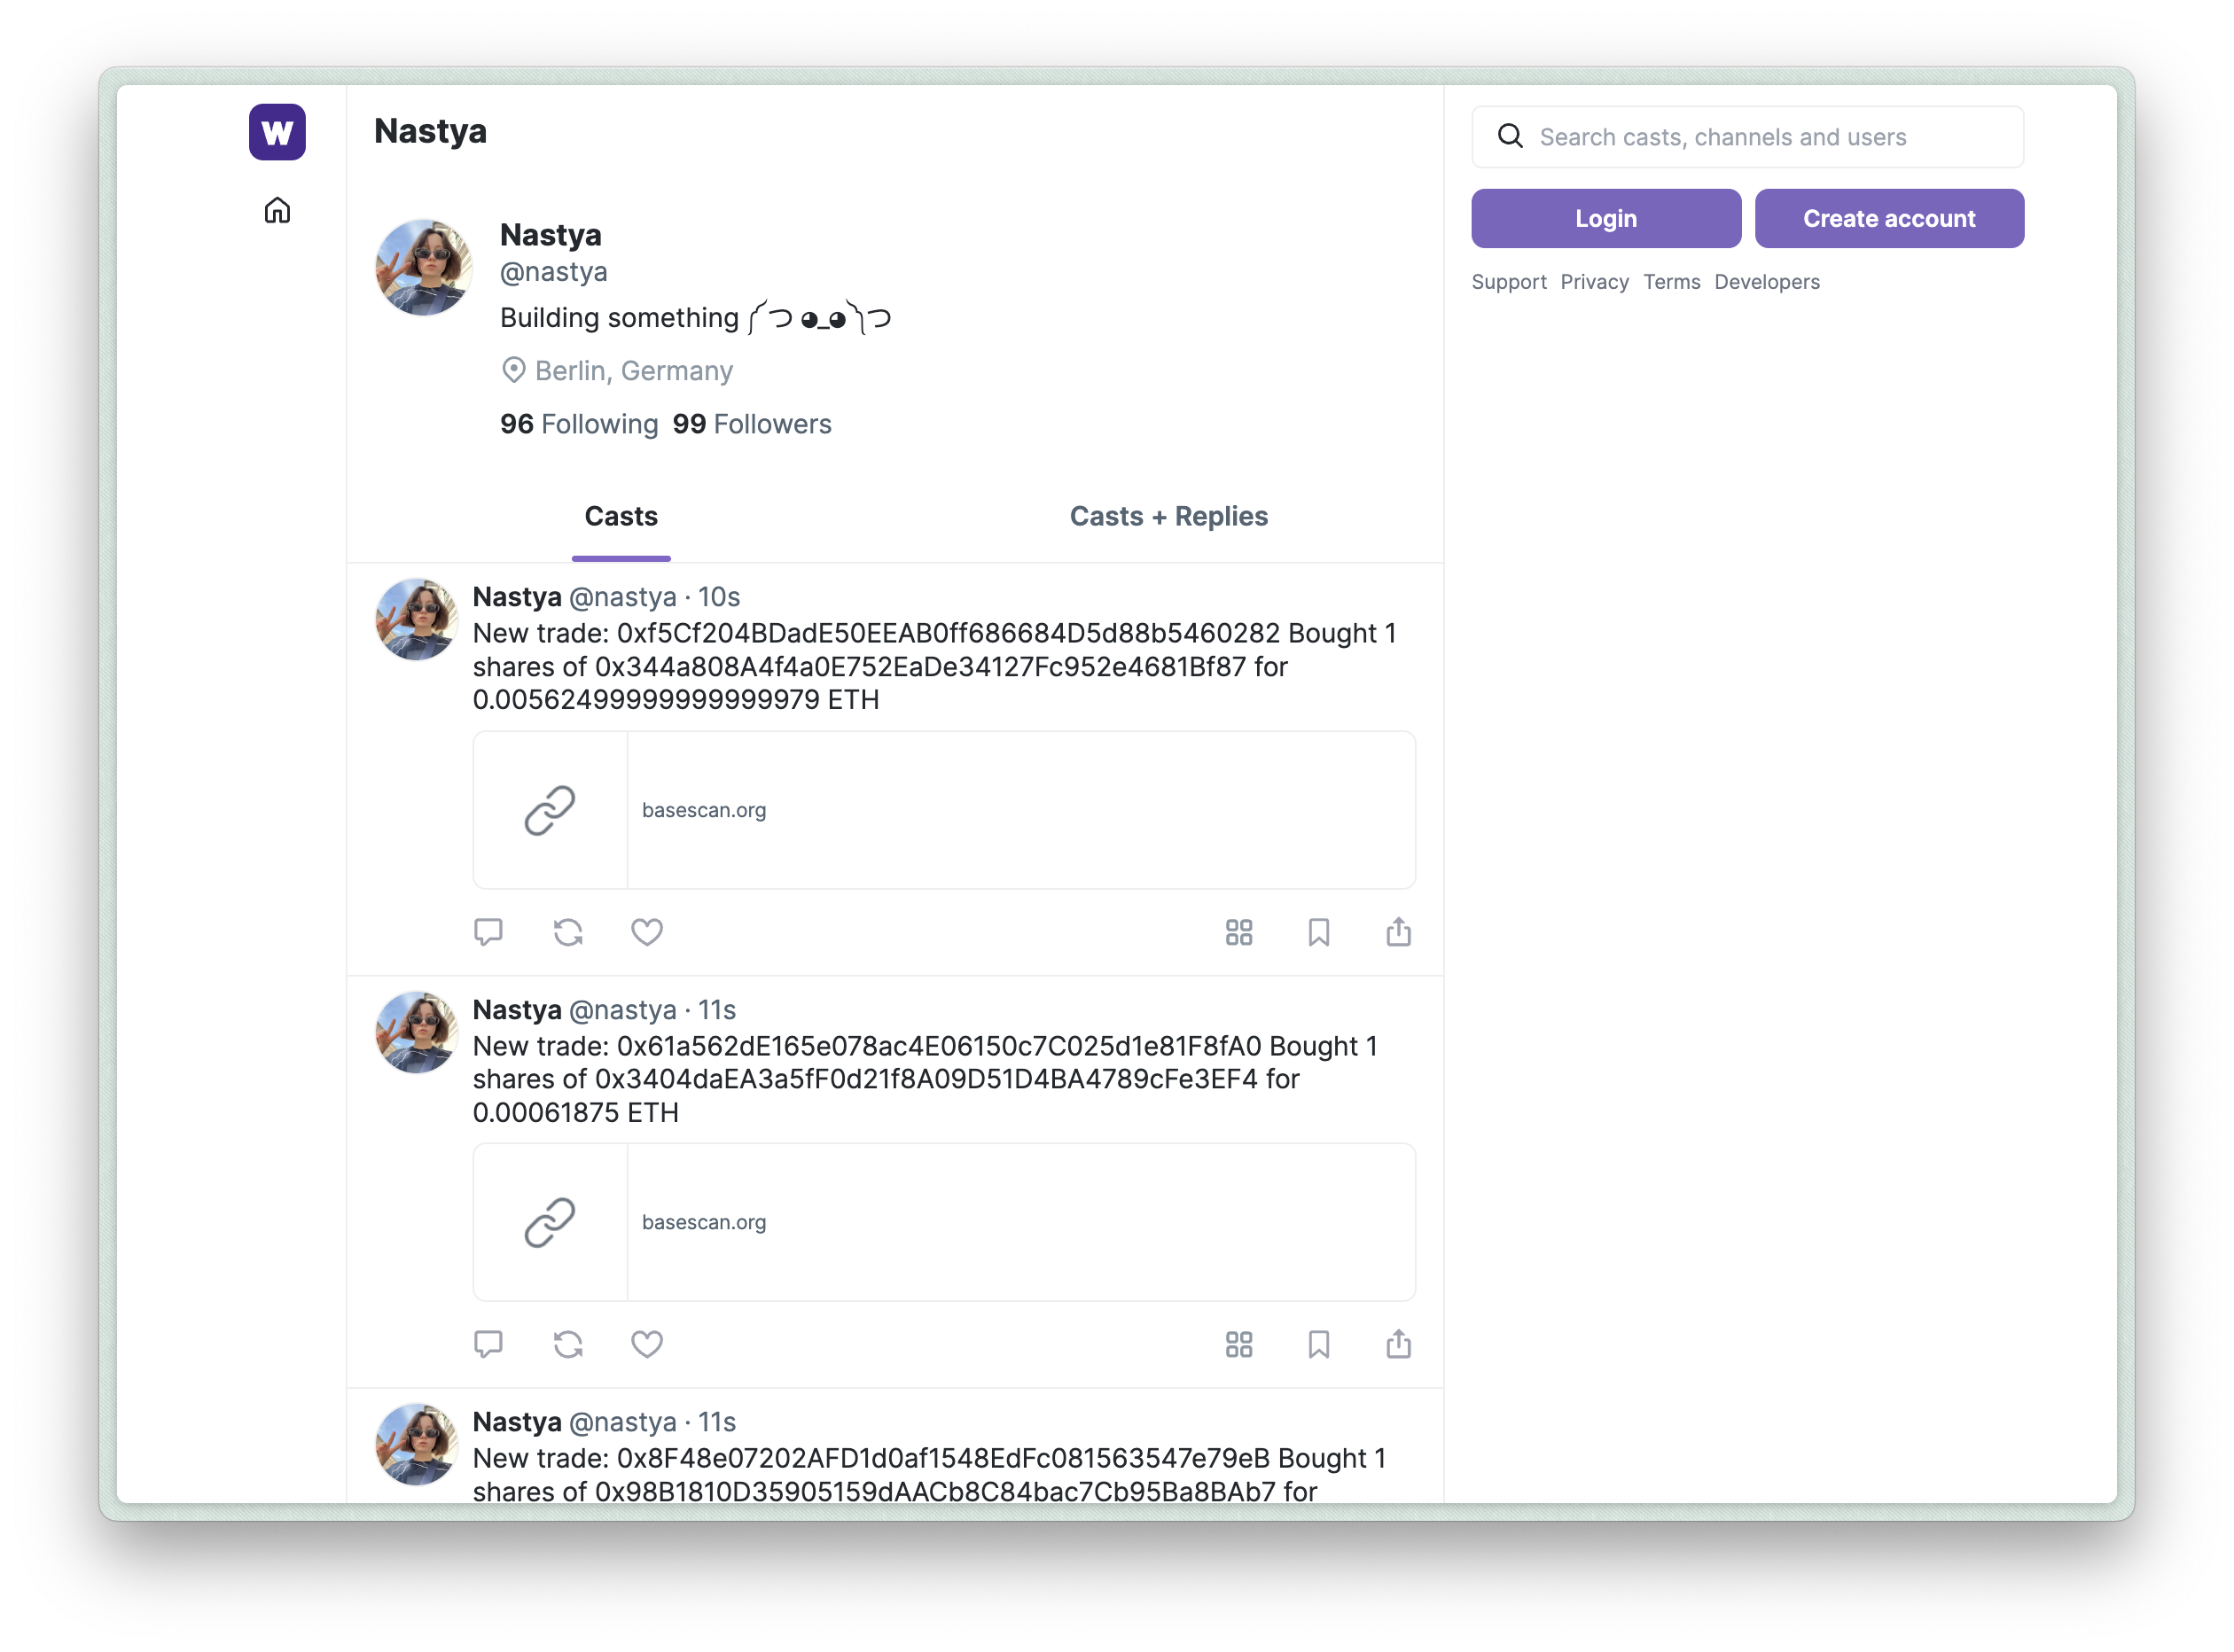
const text = `New trade: ${interpreted.trader} ${interpreted.isBuy ? 'Bought' : 'Sold'} ${ interpreted.shareAmount } shares of ${interpreted.subject} for ${interpreted.price} ETH`
const message = { text: text, url: `${ETHERSCAN_ENDPOINT}/tx/${txHash}` }
await publishToFarcaster(message) } catch (e) { console.error(e) }}Publishing to the Farcaster
We use the @standard-crypto/farcaster-js-hub-rest package to publish new casts to Farcaster. The submitCast function allows us to attach embeds like URLs or frames to the casts. We publish the casts in the bot’s profile by including the bot’s FID as the second argument.
async function publishToFarcaster(cast: { text: string; url: string }) { //... const publishCastResponse = await client.submitCast( { text: cast.text, embeds: [ { url: cast.url, }, ], }, Number(fid), signerPrivateKey, )}Step 8: Start the Bot
Use the following command to start bot locally:
bun run src/index.tsYour Farcaster bot is now set up and will monitor blockchain transactions and send casts to the bot’s account.
Conculsion
In this guide, you’ve learned how to create a Farcaster bot that monitors blockchain transactions and sends human-readable alerts. By using the Loop Decoder library, you can easily set up a bot to track specific contract addresses and chains without needing in-depth knowledge of EVM transaction decoding.
Let us know on X/Twitter (@3loop_io) if you encounter any problems or have any questions, we’d love to help you!
Happy coding!