Build a Telegram Bot for On-Chain Alerts
In this guide, you will learn how to create a Telegram bot that sends human-readable alerts about transactions happening on-chain. You can customize this bot for any EVM-compatible blockchain, and you don’t need any specific knowledge about EVM transaction decoding and interpretation.
Guide
Step 0: Prerequisites
- Bun installed (see installation guide here)
- Alchemy account (sign up here)
- Etherscan API Key (sign up here)
- Telegram account
Step 1: Clone the Repository
Clone the bot repository and install dependencies:
git clone https://github.com/3loop/example-tg-botcd example-tg-botbun iStep 2: Configure Environment Variables
Copy the .env.example file to .env and add your API keys:
cp .env.example .envvim .envFor the Telegram bot you need to specify:
ALCHEMY_API_KEY- Alchemy API key to monitor new transactions via WebSocketETHERSCAN_API_KEY- Etherscan API key, used to fetch and cache ABIsTELEGRAM_BOT_TOKENandTELEGRAM_CHAT_ID- Telegram bot credentials (see Step 3)
Step 3: Create a New Bot on Telegram
- Obtain a bot token: Start a chat with the BotFather bot in Telegram, write
/newbotinto the chat, follow the instructions, and copy the bot token. Paste its value into theTELEGRAM_BOT_TOKENvariable in the.envfile. - Obtain a chat ID: Get the chat ID of the chat where the bot should send notifications. Start a chat with your bot by pressing the
/startcommand. Then open to the linkhttps://api.telegram.org/bot<YourBOTToken>/getUpdates, whereYourBotTokenis the token you copied from the BotFather. From thechatobject, copy theidand put it into theTELEGRAM_CHAT_IDvariable in the.envfile. Check this StackOverflow answer for more details.
Step 4: Setup the Transaction Decoder
Loop Decoder requires three components: an RPC provider, ABI store, and contract metadata store. Let’s set up each one:
RPC Provider
Configure your RPC provider in constants.ts for Ethereum Mainnet (chain ID 1):
export const RPC = { 1: { url: `wss://eth-mainnet.g.alchemy.com/v2/${process.env.ALCHEMY_API_KEY}`, },}import { createPublicClient, http } from 'viem'
// Create a public client for the Ethereum Mainnet networkconst getPublicClient = (chainId: number) => { return { client: createPublicClient({ transport: http('https://rpc.ankr.com/eth'), }), }}ABI Store
Set up an in-memory ABI cache with Etherscan and 4byte.directory strategies:
import {  EtherscanStrategyResolver,  FourByteStrategyResolver,  VanillaAbiStore,  ContractABI,} from '@3loop/transaction-decoder'
// Create an in-memory cache for the ABIsconst abiCache = new Map<string, ContractABI>()
const abiStore: VanillaAbiStore = {  strategies: [    // List of stratagies to resolve new ABIs    EtherscanV2StrategyResolver({      apikey: process.env.ETHERSCAN_API_KEY || '',    }),    FourByteStrategyResolver(),  ],
  // Get ABI from memory by address, event or signature  // Can be returned the list of all possible ABIs  get: async ({ address, event, signature }) => {    const key = address?.toLowerCase() || event || signature    if (!key) return []
    const cached = abiCache.get(key)    return cached      ? [          {            ...cached,            id: key,            source: 'etherscan',            status: 'success',          },        ]      : []  },
  set: async (_key, abi) => {    const key =      abi.type === 'address'        ? abi.address.toLowerCase()        : abi.type === 'event'        ? abi.event        : abi.type === 'func'        ? abi.signature        : null
    if (key) abiCache.set(key, abi)  },}
Contract Metadata Store
Set up contract metadata resolution for token or NFT information (name, decimals, symbol):
import type { ContractData, VanillaContractMetaStore } from '@3loop/transaction-decoder'import { ERC20RPCStrategyResolver, NFTRPCStrategyResolver } from '@3loop/transaction-decoder'
// Create an in-memory cache for the contract meta-informationconst contractMetaCache = new Map<string, ContractData>()
const contractMetaStore: VanillaContractMetaStore = {  strategies: [ERC20RPCStrategyResolver, NFTRPCStrategyResolver],
  get: async ({ address, chainID }) => {    const key = `${address}-${chainID}`.toLowerCase()    const cached = contractMetaCache.get(key)    return cached ? { status: 'success', result: cached } : { status: 'empty', result: null }  },
  set: async ({ address, chainID }, result) => {    if (result.status === 'success') {      contractMetaCache.set(`${address}-${chainID}`.toLowerCase(), result.result)    }  },}
Create Decoder Instance
Combine all components into a TransactionDecoder instance:
import { TransactionDecoder } from '@3loop/transaction-decoder'
const decoder = new TransactionDecoder({  getPublicClient,  abiStore,  contractMetaStore,})
Step 5: Decode and Interpret Transactions
With the decoder set up, you can now decode transactions and make them human-readable:
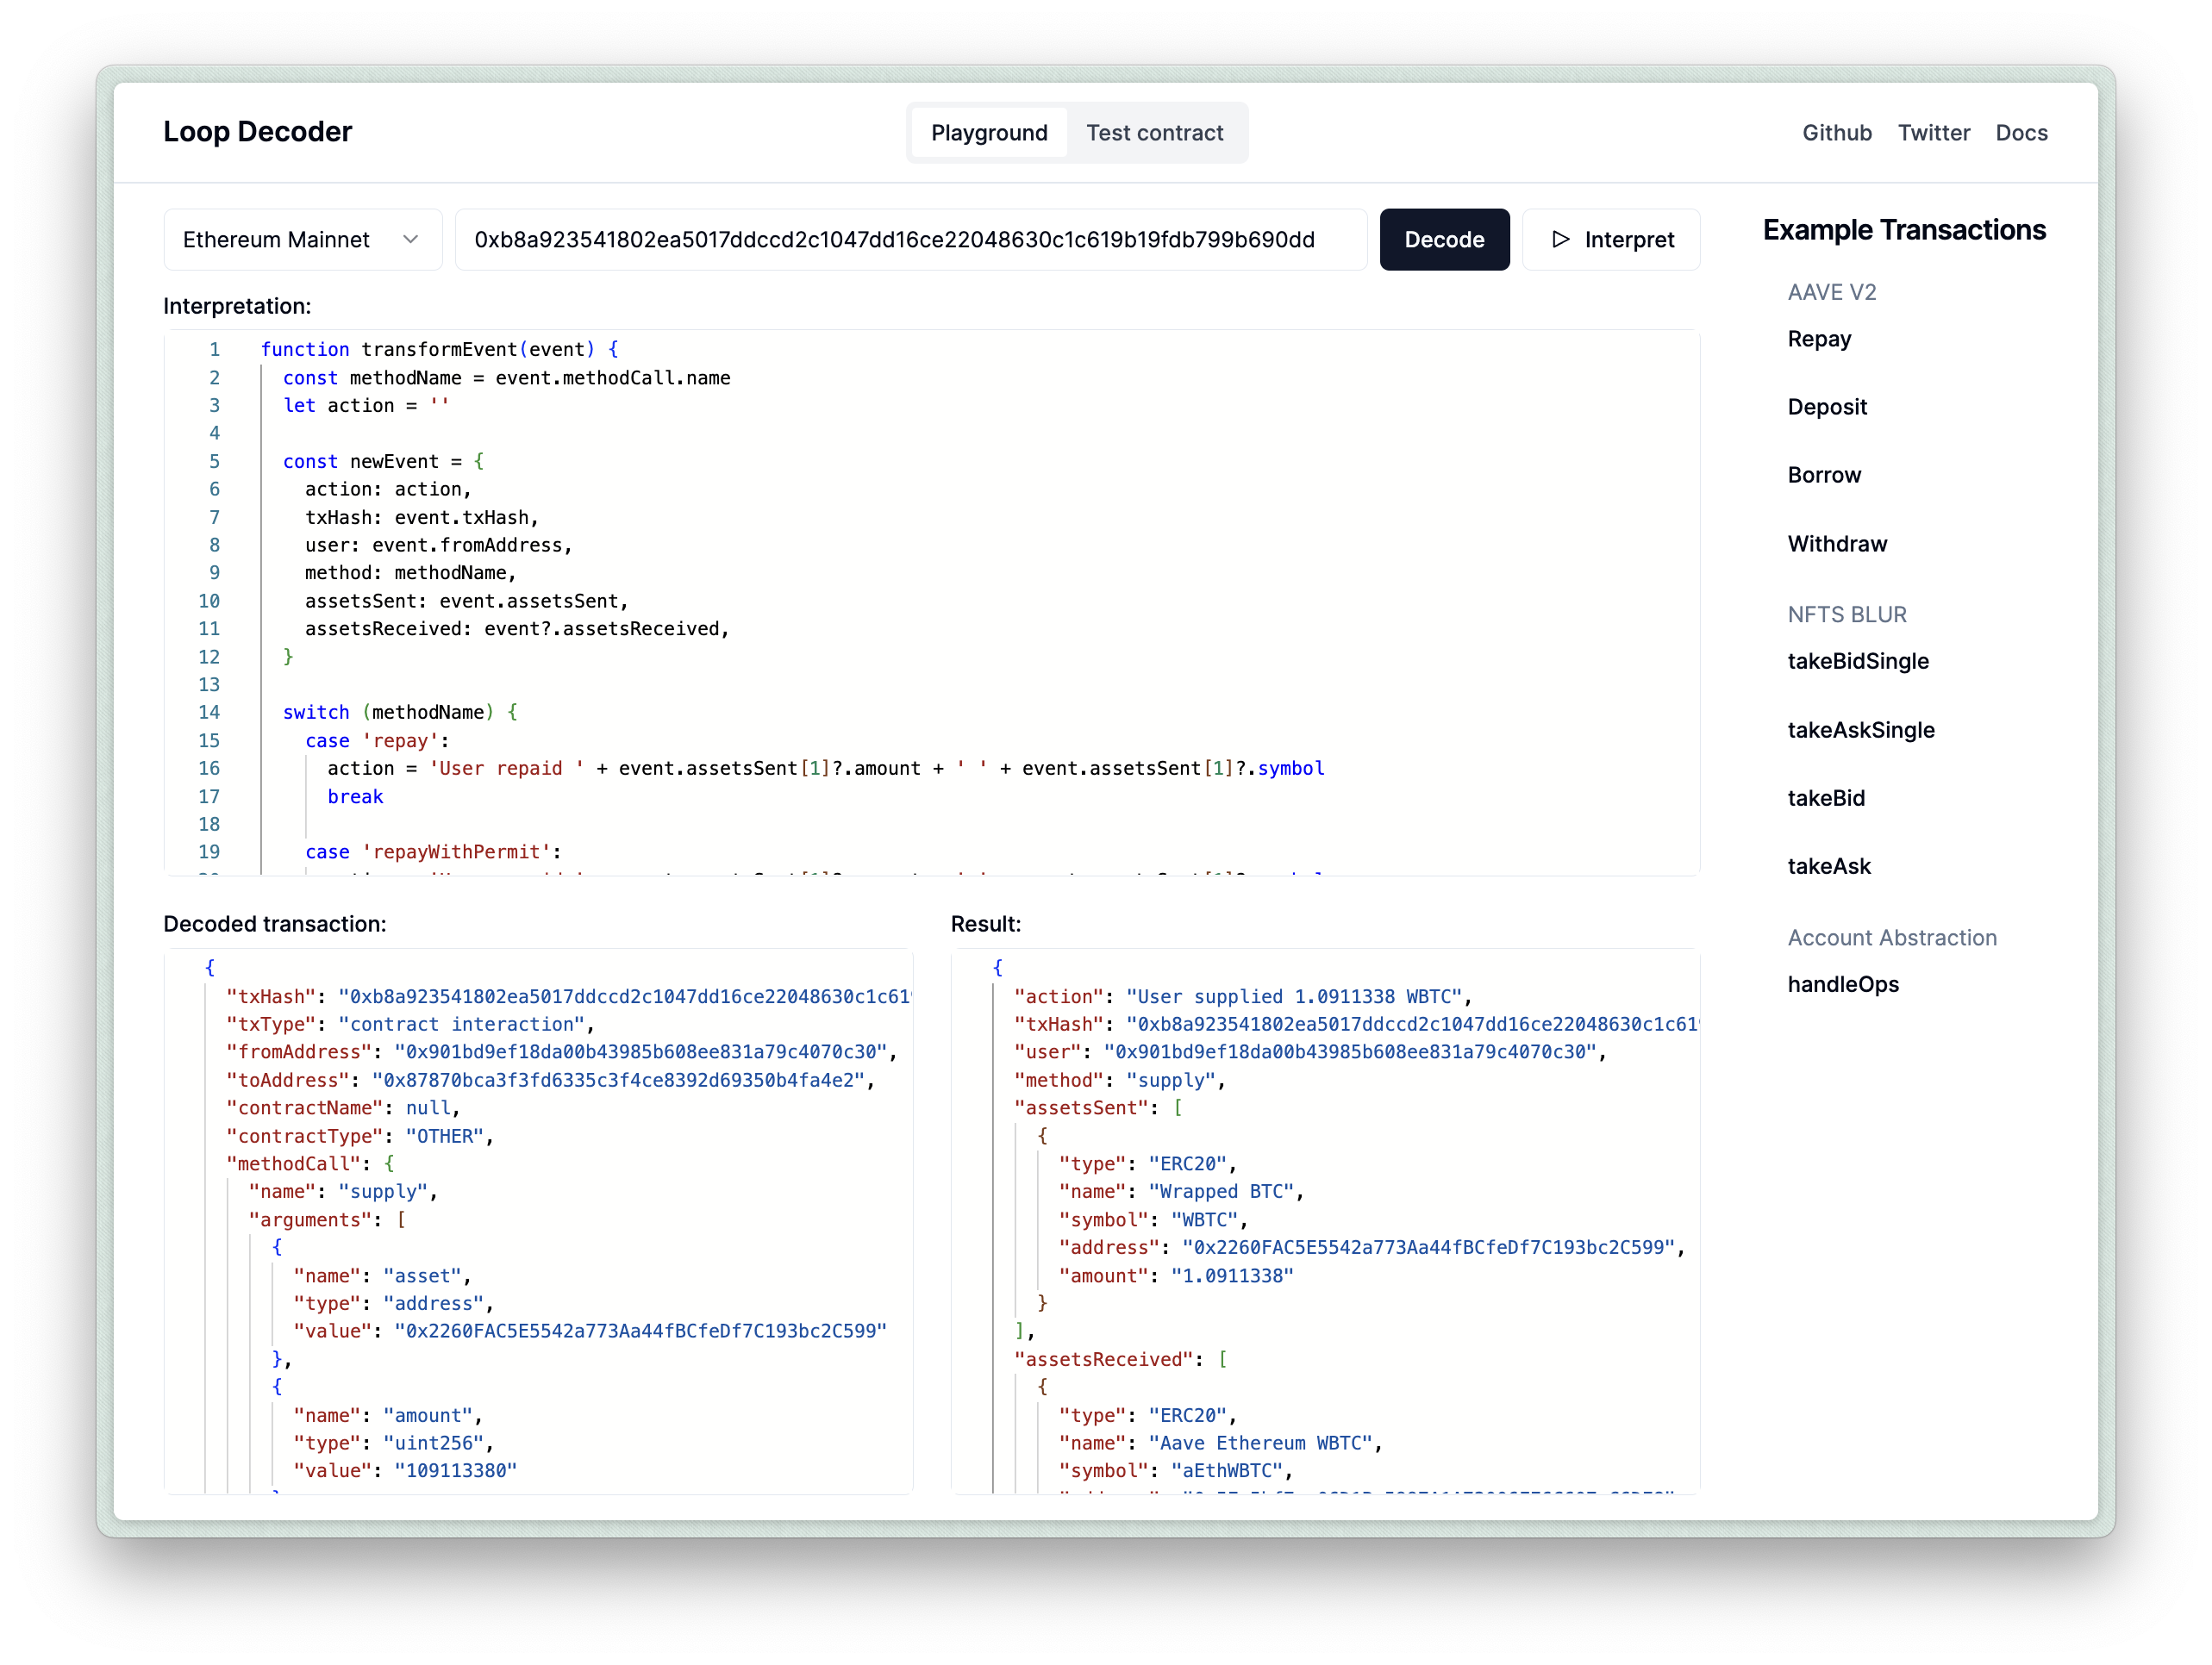
// 1. Decode the transactionconst decoded = await decoder.decodeTransaction({  chainID: CHAIN_ID,  hash: txHash,})
// 2. Interpret it (make it human-readable)const interpreted = interpretTx(decoded)
// 3. Use the resultconsole.log(interpreted.action) // e.g., "Supplied 1000 USDC to AAVE V3"
View a decoded AAVE V3 transaction example in our playground. You can test the interpretTx function by pasting it into the Interpretation field.
Step 6: Monitor AAVE V3 Transactions
Set up real-time monitoring for AAVE V3 transactions. Update the contract address in constants.ts:
export const CONTRACT_ADDRESS = '0x87870Bca3F3fD6335C3F4ce8392D69350B4fA4E2'export const CHAIN_ID = 1Subscribe to new transactions and process them:
// Subscribe to AAVE V3 transactionspublicClient.transport.subscribe({ method: 'eth_subscribe', params: [ 'alchemy_minedTransactions', { addresses: [{ to: CONTRACT_ADDRESS }], includeRemoved: false, hashesOnly: true, }, ], onData: (data: any) => { const hash = data?.result?.transaction?.hash if (hash) handleTransaction(hash) },})
// Process each transactionasync function handleTransaction(txHash: string) { try { // 1. Decode const decoded = await decoder.decodeTransaction({ chainID: CHAIN_ID, hash: txHash, })
if (!decoded) return
// 2. Interpret const interpreted = interpretTx(decoded)
if (!interpreted.action) { console.log('No defined action for this transaction.', txHash) return }
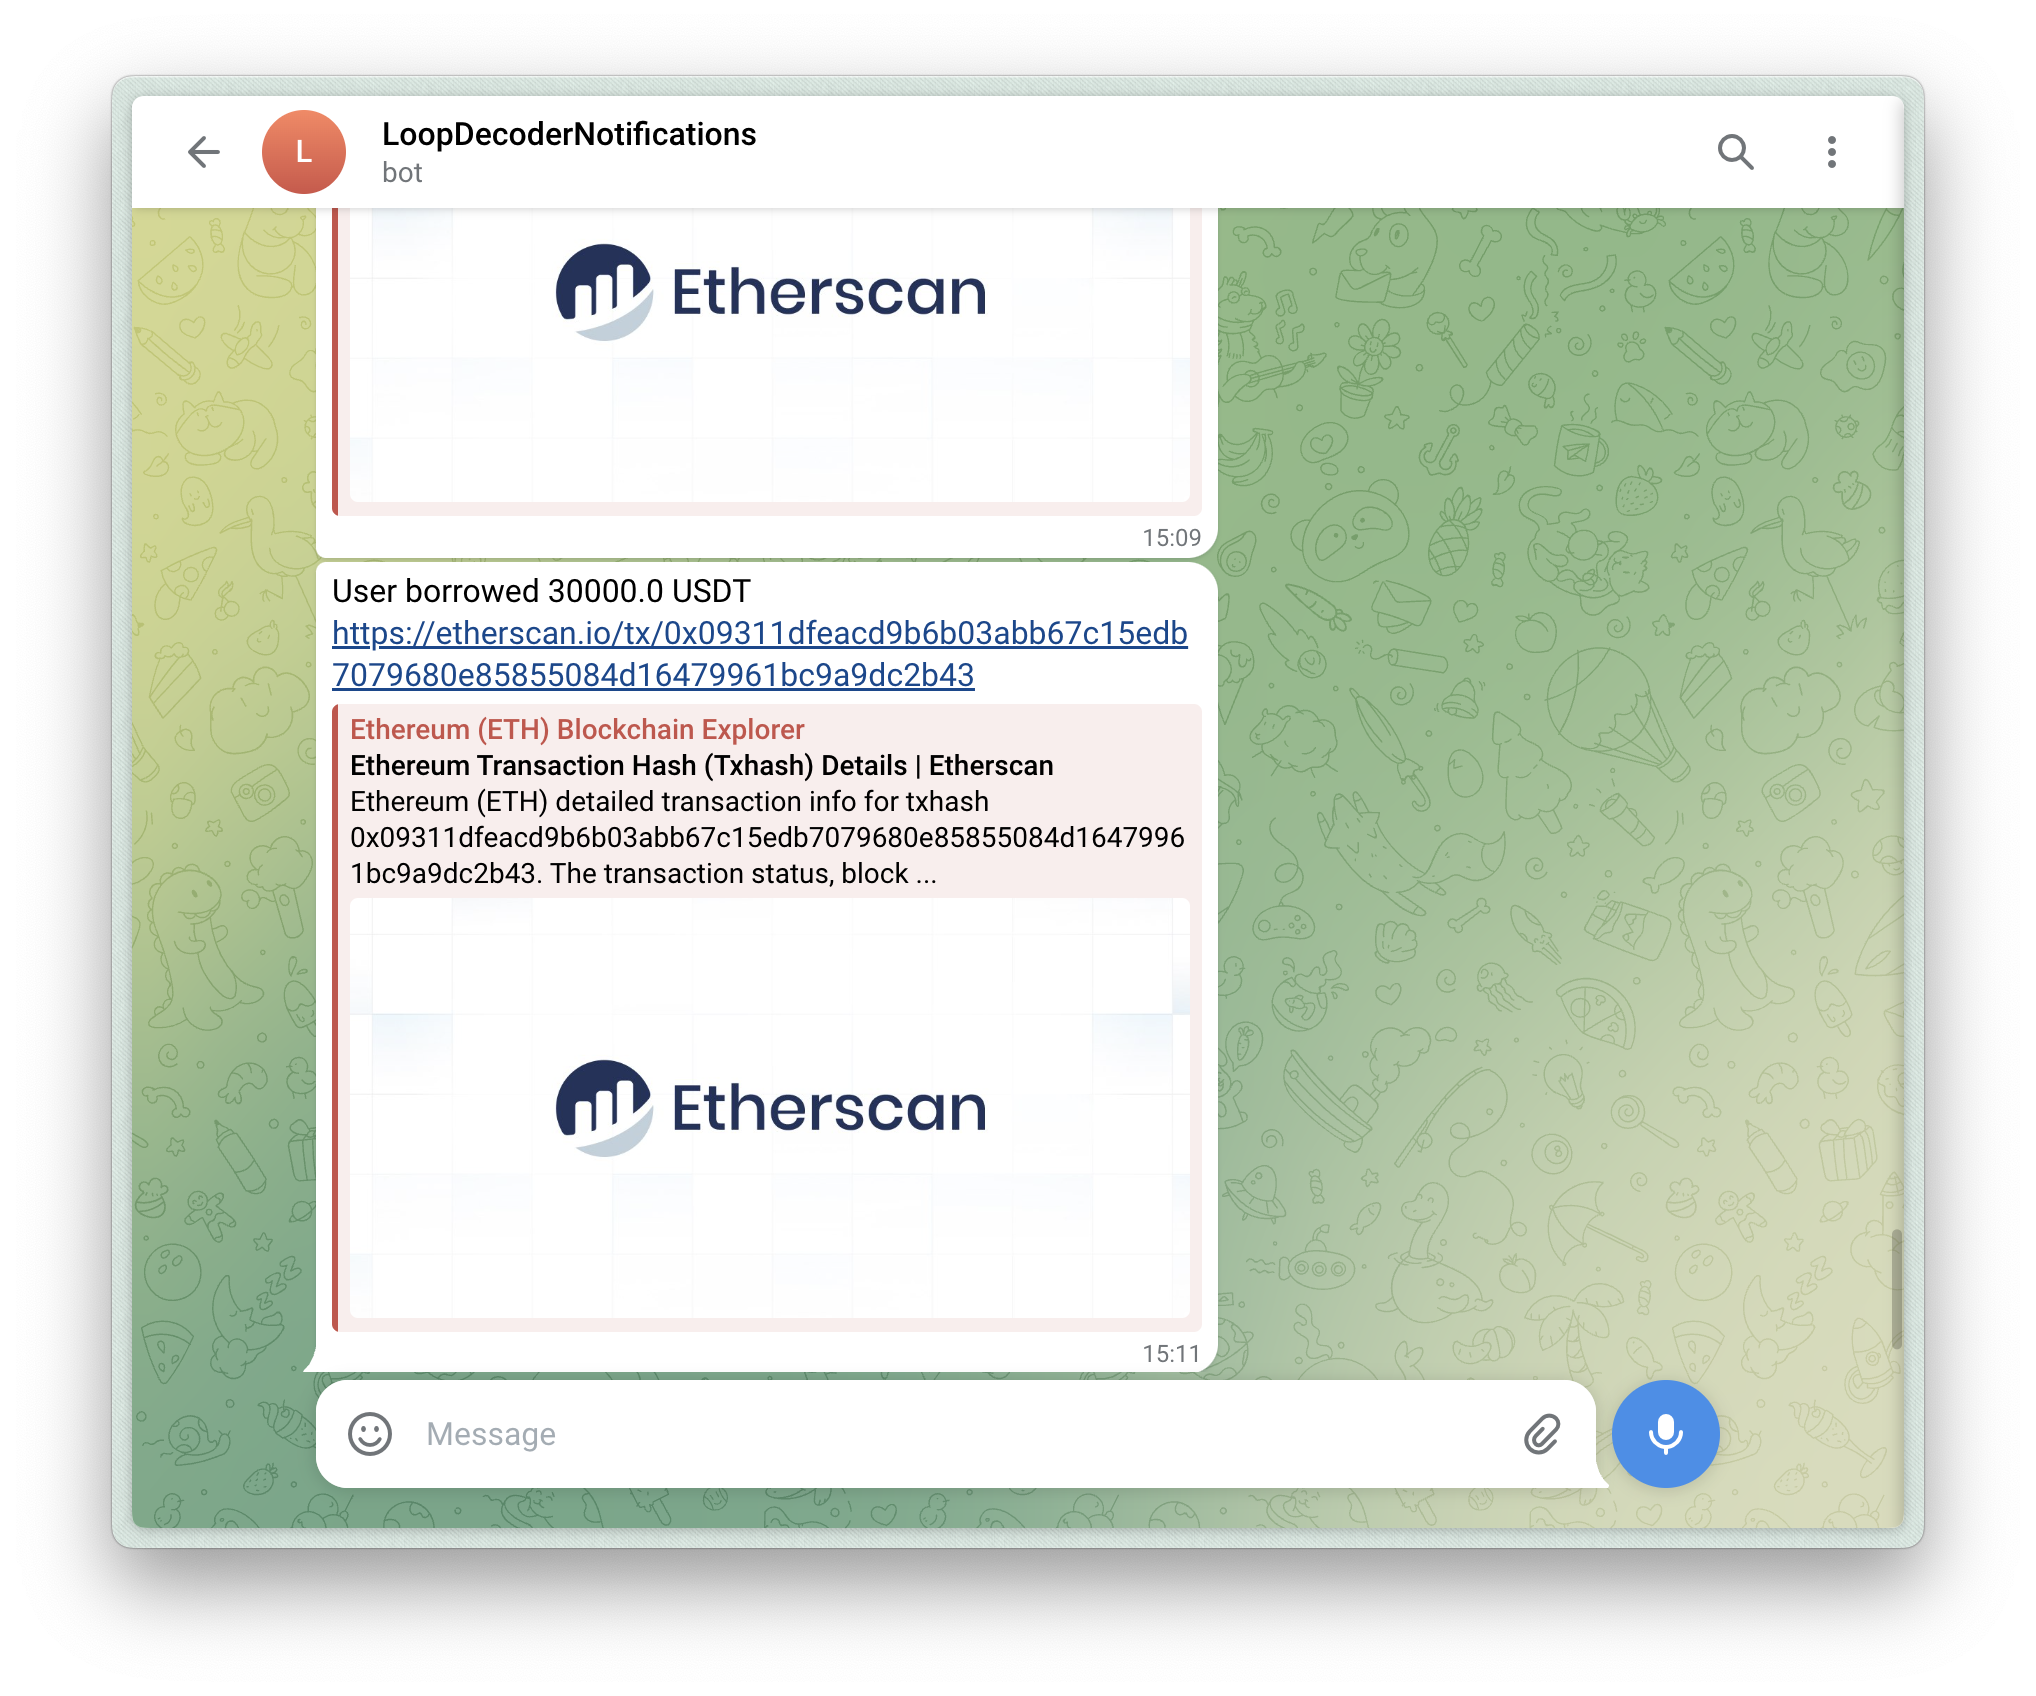
// 3. Send to Telegram const botMessage = `${interpreted.action}\nhttps://etherscan.io/tx/${txHash}` bot.sendMessage(chatId, botMessage) } catch (e) { console.error(e) }}Step 7: Run the Bot
Start the bot locally:
bun run src/index.tsThe bot will now monitor AAVE V3 transactions and send alerts to your Telegram chat.
Next Steps
You’ve built a Telegram bot that:
- Monitors specific contracts in real-time
- Decodes transactions automatically
- Generates human-readable descriptions
- Sends alerts to Telegram
Customize it further:
- Track different contracts by updating
CONTRACT_ADDRESS - Modify the message format in
handleTransaction - Add filters for specific transaction types or amounts
- Deploy to a server for 24/7 monitoring
Need help? Reach out on X/Twitter @3loop_io or check the full code example.