Build a Telegram Bot for human-readable alerts
In this guide, you will learn how to create a Telegram bot that sends human-readable alerts about transactions happening on-chain. You can customize this bot for any EVM-compatible blockchain, and you don’t need any specific knowledge about EVM transaction decoding and interpretation.
Guide
Step 0: Prerequisites
- An installed Bun (see installation guide here)
- An Alchemy account (sign up here)
- An Etherscan account (sign up here)
- A Telegram account
Step 1: Clone the Repository
Clone the Bot repository from GitHub and install project dependecies:
git clone https://github.com/3loop/example-tg-botcd example-tg-botbun iStep 2: Add Etherescan and Alchemy API Keys
Copy and rename the .env.example file to .env, then paste the Alchemy and Etherescan API keys into the ALCHEMY_API_KEY and ETHERSCAN_API_KEY variables.
cp .env.example .envvim .envWe use the Alchemy API key to monitor new transactions happening on the blockchain, and the Etherscan API key (from the free plan) to fetch contract ABIs and avoid hitting rate limits. The Etherscan API could be optional if the transactions you are interested in do not interact with many contracts, but since we are testing AAVE V3 it will have many interactions.
Step 3: Create a New Bot on Telegram
- Obtain a bot token: Start a chat with the BotFather bot in Telegram, write
/newbotinto the chat, follow the instructions, and copy the bot token. Paste its value into theTELEGRAM_BOT_TOKENvariable in the.envfile. - Obtain a chat ID: Get the chat ID of the chat where the bot should send notifications. Start a chat with your bot by pressing the
/startcommand. Then open to the linkhttps://api.telegram.org/bot<YourBOTToken>/getUpdates, whereYourBotTokenis the token you copied from the BotFather. From thechatobject, copy theidand put it into theTELEGRAM_CHAT_IDvariable in the.envfile. Check this StackOverflow answer for more details.
Step 4: Setup the Decoder
Now, let’s go through the code. To begin using the Loop Decoder, we need to set up the following components:
RPC Provider
We’ll create a function that returns an object with aPublicClient based on the chain ID. In this example, we are going to support the Ethereum Mainnet.
The constants.ts file contains the RPC URL and configuration:
export const RPC = { 1: { url: `wss://eth-mainnet.g.alchemy.com/v2/${process.env.ALCHEMY_API_KEY}`, },}The getPublicClient returns an RPC client based on the chaind ID and the config from constants.ts:
import { createPublicClient, http } from 'viem'
// Create a public client for the Ethereum Mainnet networkconst getPublicClient = (chainId: number) => {  return {    client: createPublicClient({      transport: http('https://rpc.ankr.com/eth'),    }),  }}
ABI Loader
To avoid making unecessary calls to third-party APIs, Loop Decoder uses an API that allows cache. For this example, we will keep it simple and use an in-memory cache. We will also use some strategies to download contract ABIs from Etherscan and 4byte.directory. You can find more information about the strategies in the Strategies reference.
Create a cache for contract ABI:
import {  EtherscanStrategyResolver,  FourByteStrategyResolver,  VanillaAbiStore,  ContractABI,} from '@3loop/transaction-decoder'
// Create an in-memory cache for the ABIsconst abiCache = new Map<string, ContractABI>()
// ABI store implementation with caching and multiple resolution strategiesconst abiStore: VanillaAbiStore = {  strategies: [    // List of stratagies to resolve new ABIs    EtherscanV2StrategyResolver({      apikey: process.env.ETHERSCAN_API_KEY || '',    }),    FourByteStrategyResolver(),  ],
  // Get ABI from memory by address, event or signature  // Can be returned the list of all possible ABIs  get: async ({ address, event, signature }) => {    const key = address?.toLowerCase() || event || signature    if (!key) return []
    const cached = abiCache.get(key)    return cached      ? [          {            ...cached,            id: key,            source: 'etherscan',            status: 'success',          },        ]      : []  },
  set: async (_key, abi) => {    const key =      abi.type === 'address'        ? abi.address.toLowerCase()        : abi.type === 'event'        ? abi.event        : abi.type === 'func'        ? abi.signature        : null
    if (key) abiCache.set(key, abi)  },}
Contract Metadata Loader
Create an in-memory cache for contract meta-information. Using ERC20RPCStrategyResolver we will automatically retrieve token meta information from the contract such as token name, decimals, symbol, etc.
import type { ContractData, VanillaContractMetaStore } from '@3loop/transaction-decoder'import { ERC20RPCStrategyResolver } from '@3loop/transaction-decoder'
// Create an in-memory cache for the contract meta-informationconst contractMetaCache = new Map<string, ContractData>()
// Contract metadata store implementation with in-memory cachingconst contractMetaStore: VanillaContractMetaStore = {  strategies: [ERC20RPCStrategyResolver],
  get: async ({ address, chainID }) => {    const key = `${address}-${chainID}`.toLowerCase()    const cached = contractMetaCache.get(key)    return cached ? { status: 'success', result: cached } : { status: 'empty', result: null }  },
  set: async ({ address, chainID }, result) => {    if (result.status === 'success') {      contractMetaCache.set(`${address}-${chainID}`.toLowerCase(), result.result)    }  },}
Loop Decoder instance
Finally, we’ll create a new instance of the LoopDecoder class.
import { TransactionDecoder } from '@3loop/transaction-decoder'
const decoder = new TransactionDecoder({  getPublicClient: getPublicClient,  abiStore: abiStore,  contractMetaStore: contractMetaStore,})
Step 5: Decode and Interpret a Transaction
After creating the decoder object in the decoder.ts file, we can use its decodeTransaction method to decode transactions by hash:
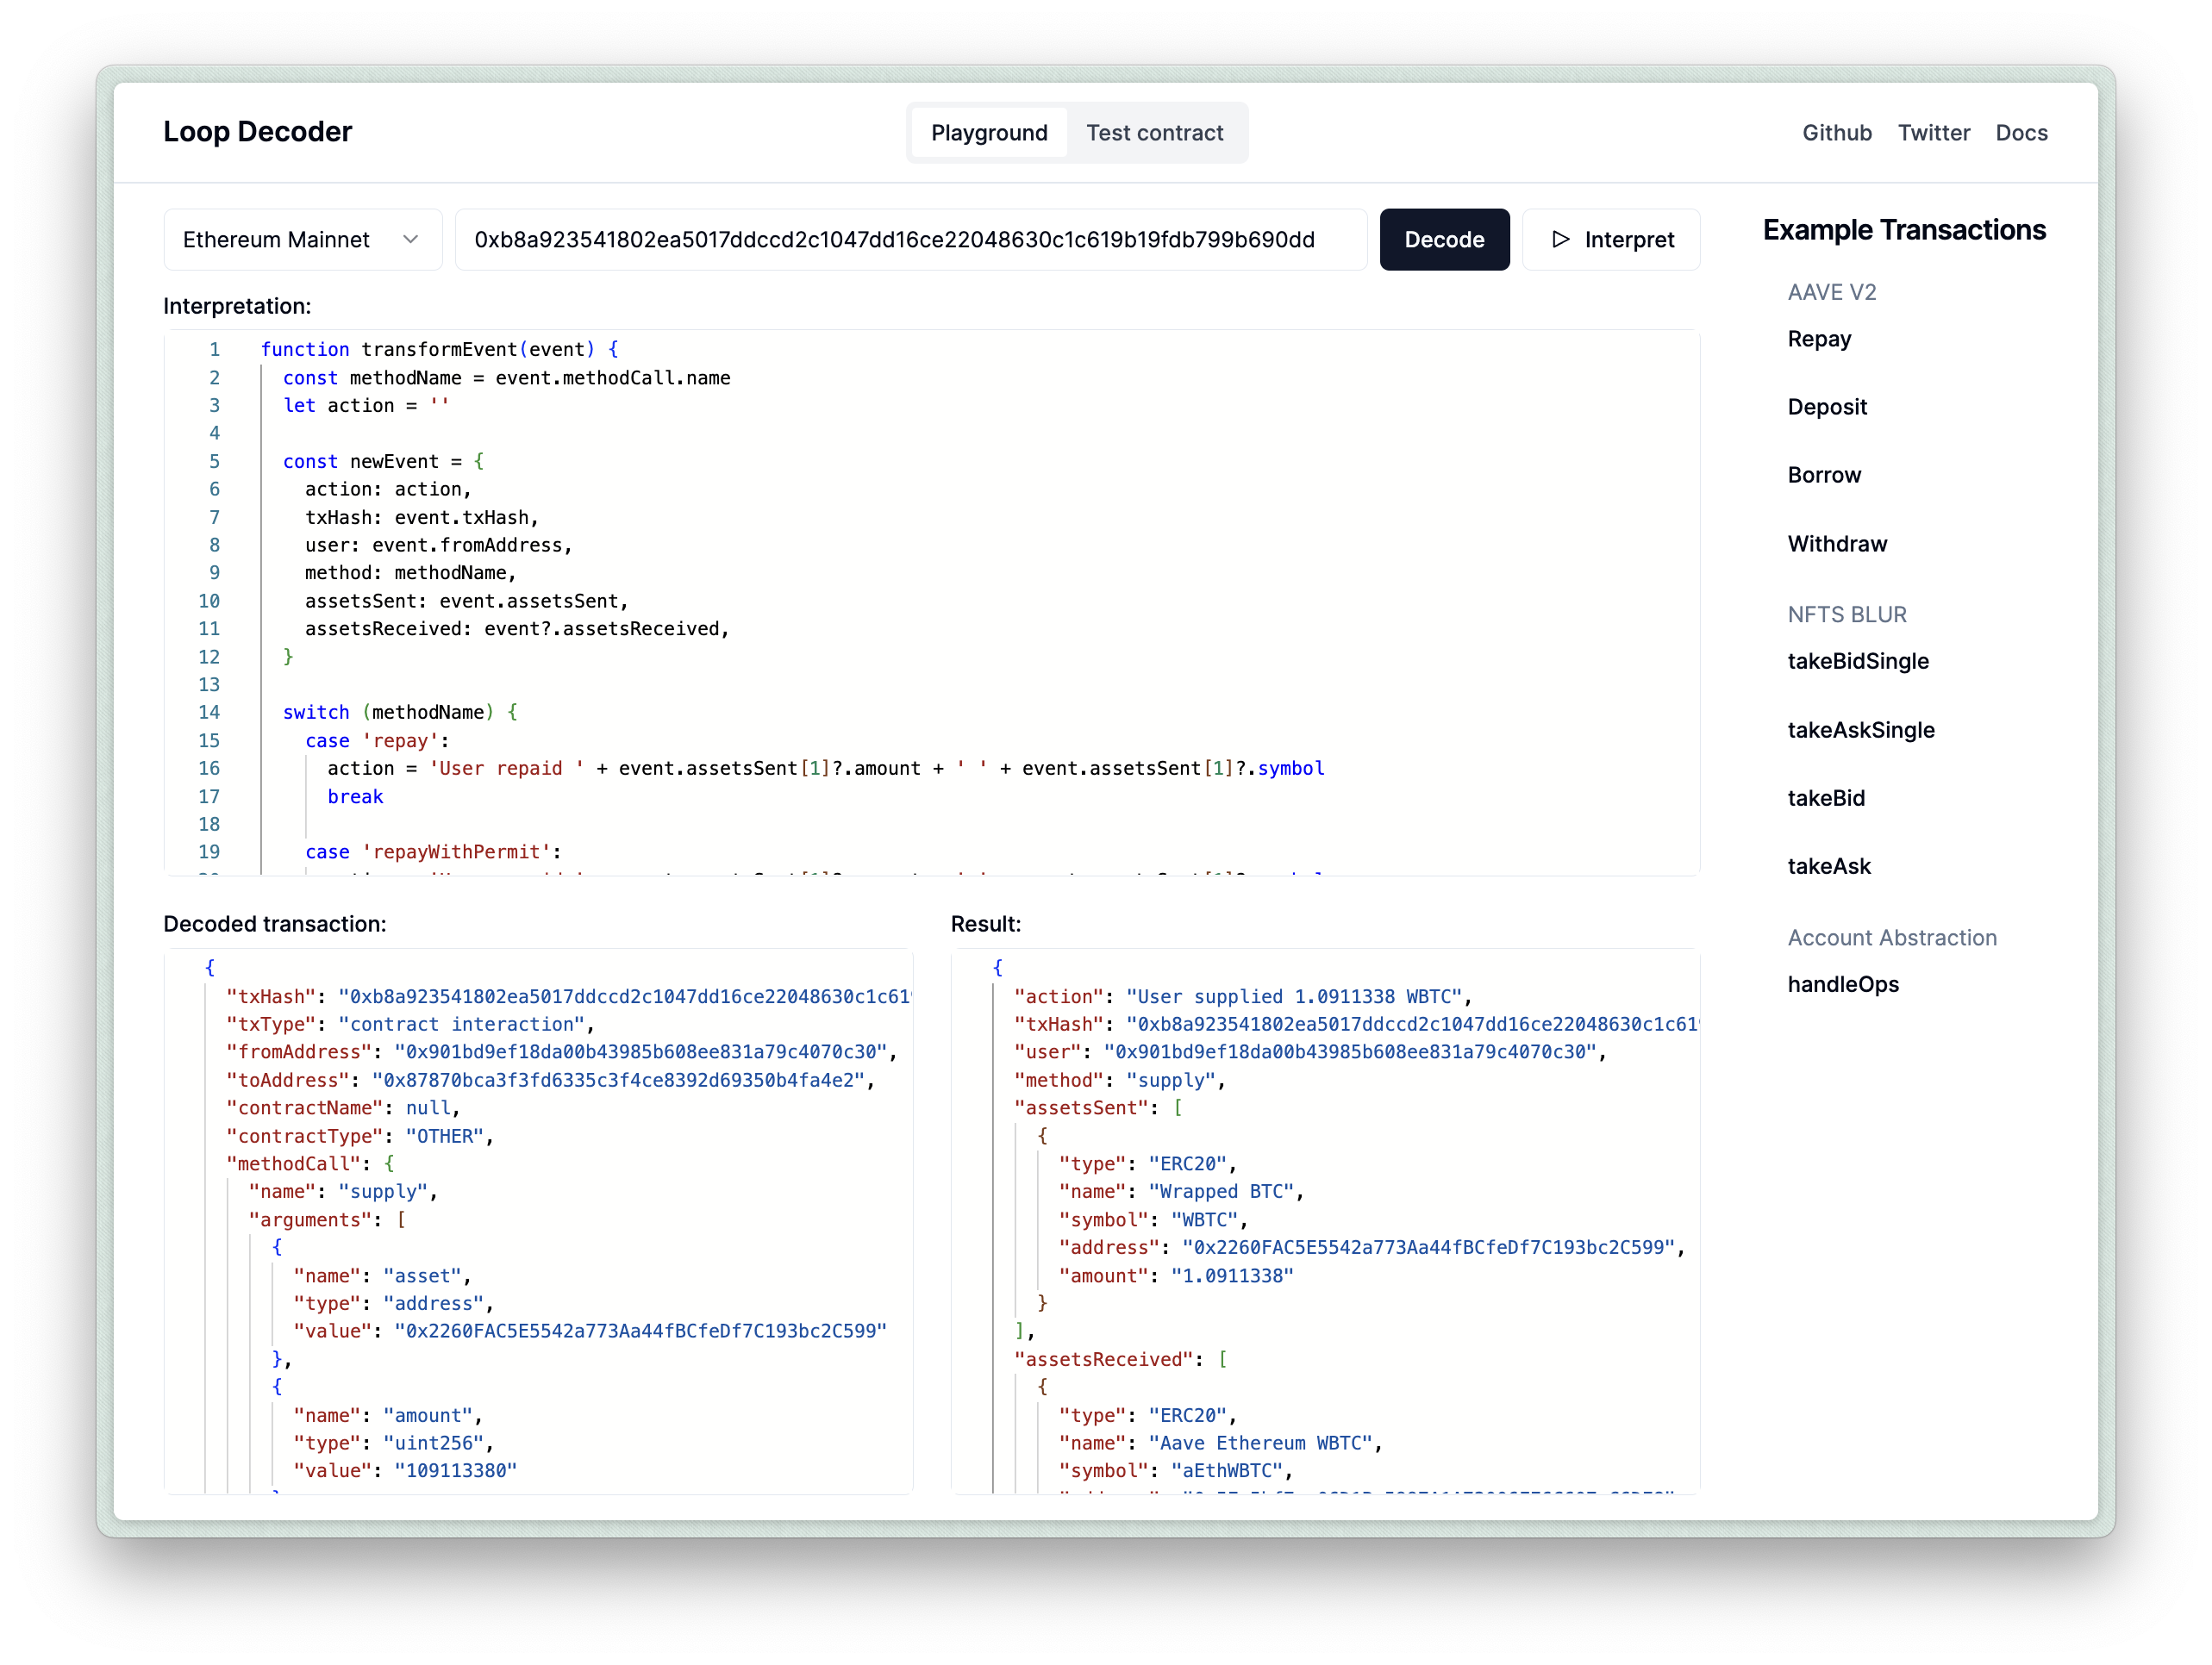
const decoded = await decoder.decodeTransaction({ chainID: chainID, hash: txHash,})The decodeTransaction method returns a DecodedTransaction object, which you can inspect using our playground. Here is an example of an AAVE V3 transaction.
To interpret a decoded transaction, the interpreter.ts file contains a transformEvent function that transforms the DecodedTransaction and adds an action description. You can test the transformEvent function by putting it into the Interpretation field on the playground with the AAVE V3 example, and pressing “Interpret”.
Step 6: Create a Contract Subscription
The bot is set to monitor AAVE V3 transactions on the Ethereum mainnet by default. Update the contract address and chain ID in the constants.ts file:
export const CONTRACT_ADDRESS = '0x87870Bca3F3fD6335C3F4ce8392D69350B4fA4E2'export const CHAIN_ID = 1In the program’s entry point, we start a WebSocket subscription for new transactions using Alchemy’s WebSocket RPC.
async function createSubscription(address: string) {  await publicClient.transport.subscribe({    method: 'eth_subscribe',    params: [      //@ts-ignore      'alchemy_minedTransactions',      {        addresses: [{ to: address }],        includeRemoved: false,        hashesOnly: true,      },    ],    onData: (data: any) => {      const hash = data?.result?.transaction?.hash      if (hash) handleTransaction(hash)    },    //...  })}
createSubscription(CONTRACT_ADDRESS)
Step 7: Handle a new Transaction
The handleTransaction function is responsible for decoding incoming alerts and sending a Telegram message. You can customize the bot message or add extra information by tweaking the botMessage variable.
async function handleTransaction(txHash?: string) { try { //...
const decoded = await decoder.decodeTransaction({ chainID: CHAIN_ID, hash: txHash, })
if (!decoded) return; const interpreted = interpretTx(decoded as DecodedTransaction);
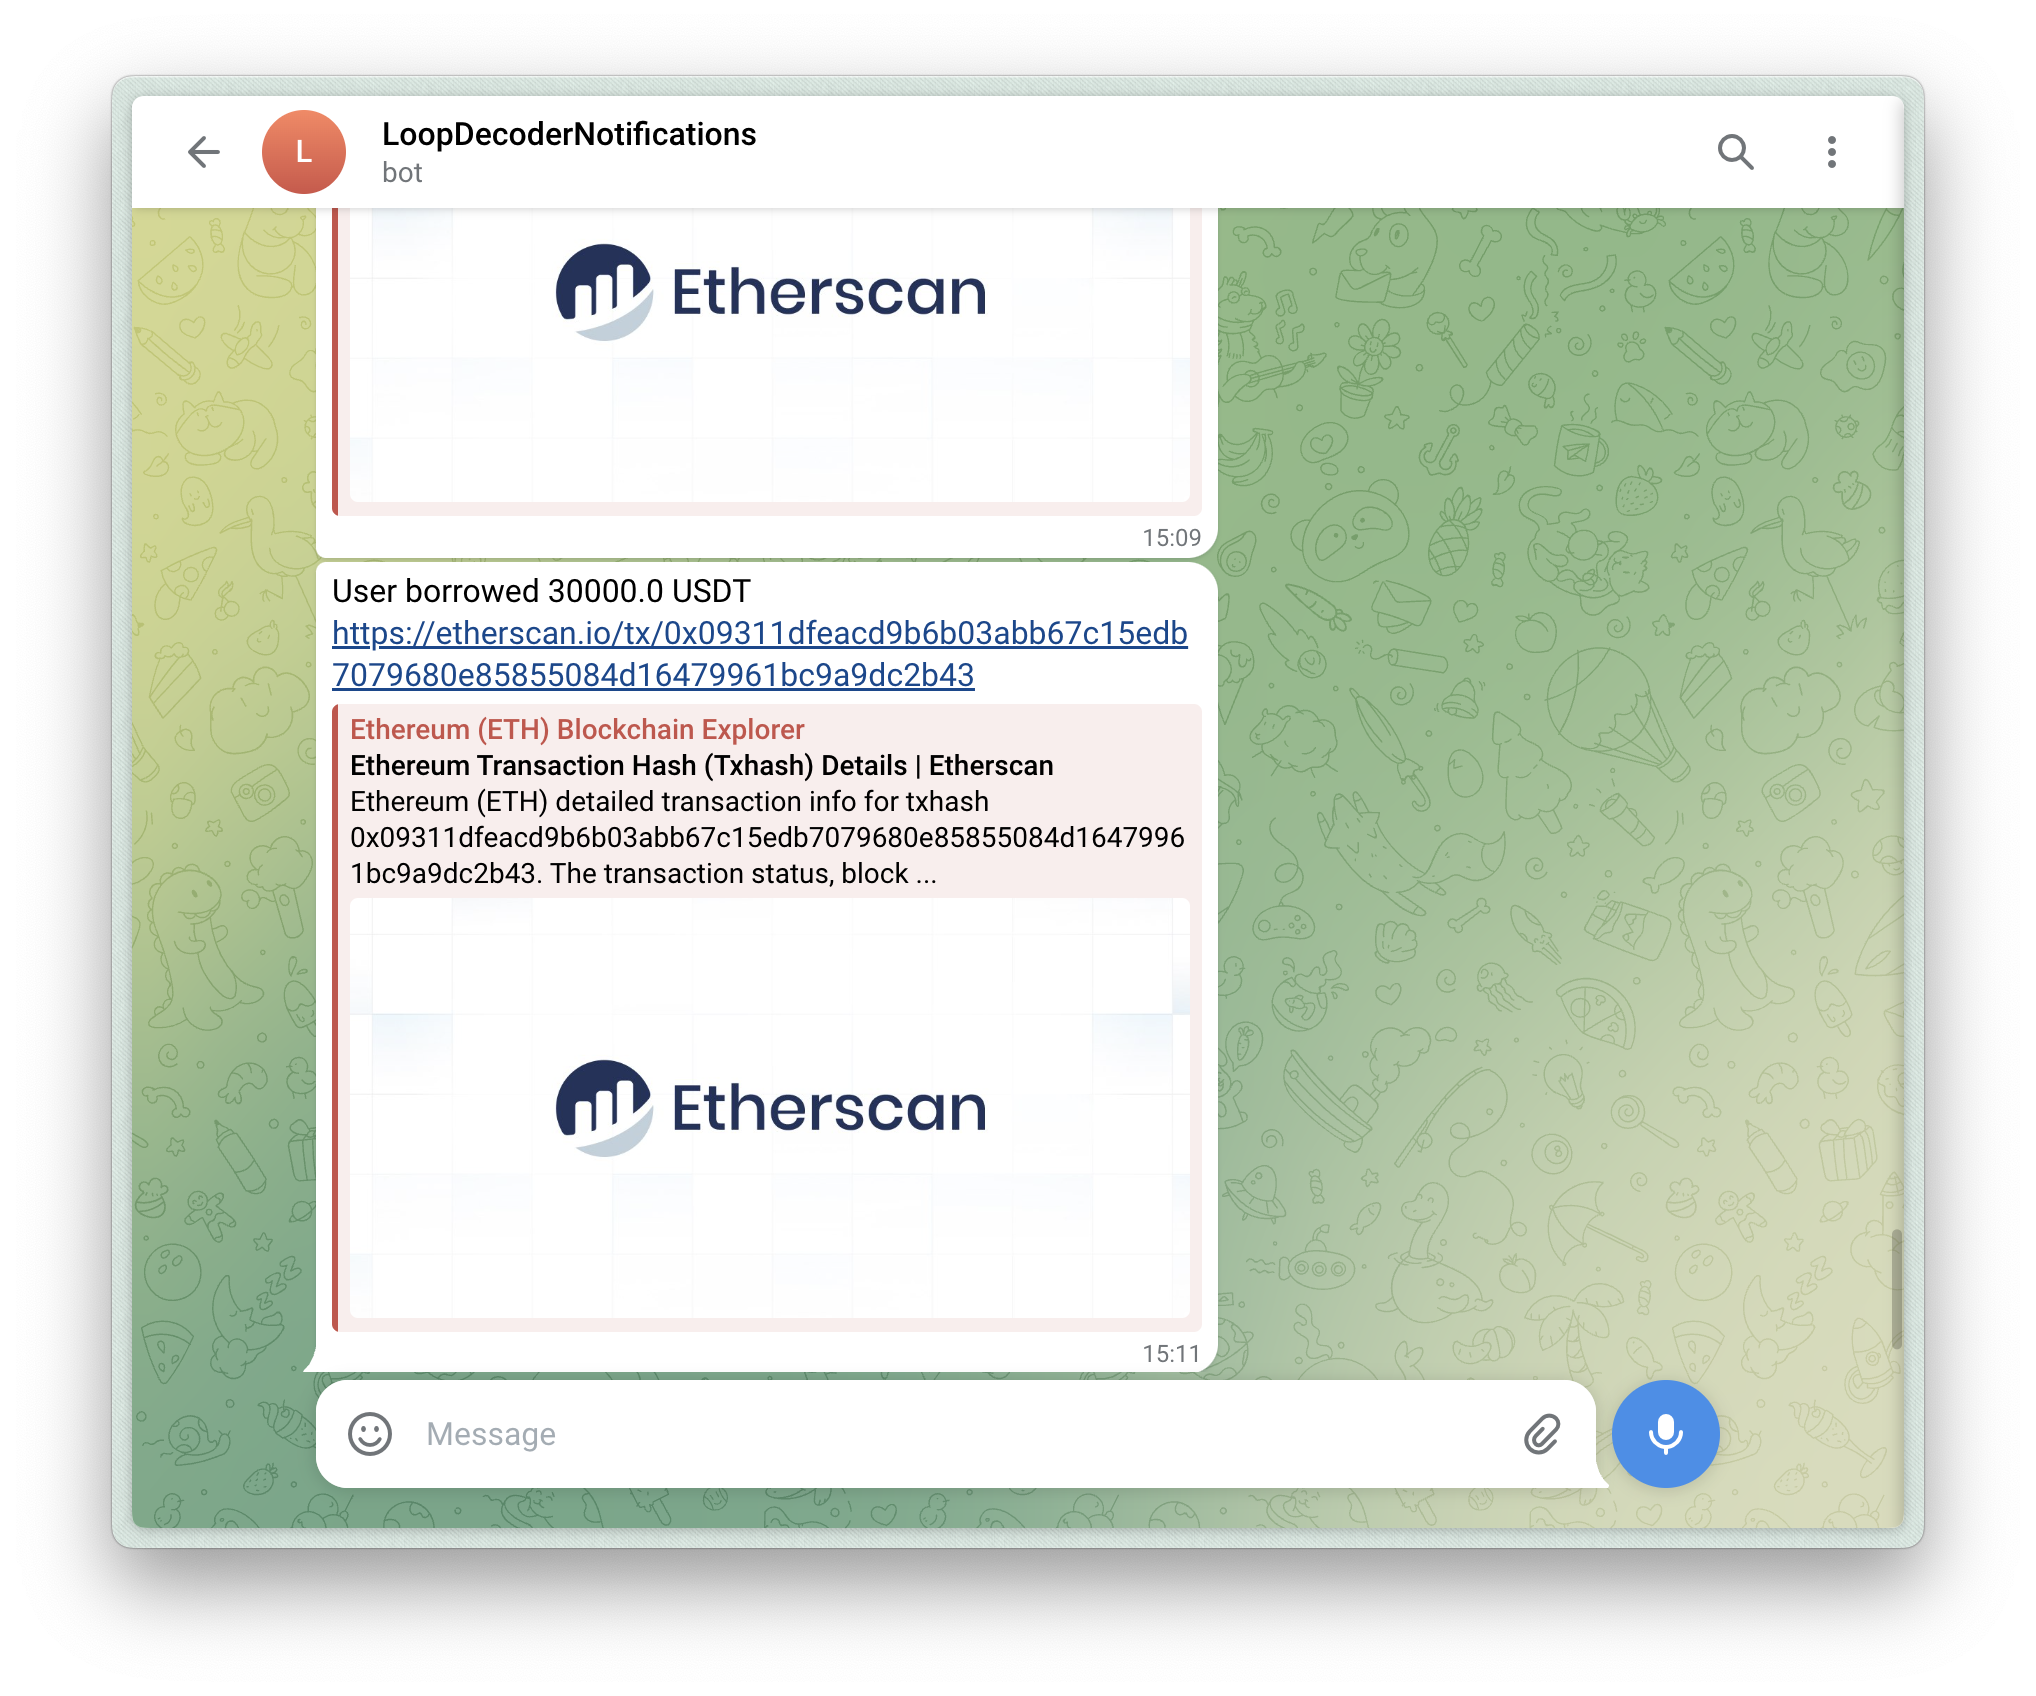
if (!interpreted.action) { console.log("No defined action for this transaction.", txHash); return; } const botMessage = `${interpreted.action} <https://etherscan.io/tx/${txHash}`>; bot.sendMessage(chatId, botMessage); } catch (e) { console.error(e); }}Step 8: Start the Bot
Use the following command to start the server locally:
bun run src/index.tsYour Telegram bot is now set up and will monitor blockchain transactions and send alerts to the specified chat or channel.
Conculsion
In this guide, you’ve learned how to create a Telegram bot that monitors blockchain transactions and sends human-readable alerts. By using the Loop Decoder library, you can easily set up a bot to track specific contract addresses and chains without needing in-depth knowledge of EVM transaction decoding.
Let us know on X/Twitter (@3loop_io) if you encounter any problems or have any questions, we’d love to help you!
Happy coding!